
How to Create a Mesh Flower in Illustrator
Tutorial Details
- Program: Adobe Illustrator
- Version: CS4
- Difficulty: Intermediate
- Estimated Completion Time: 1.5 hours

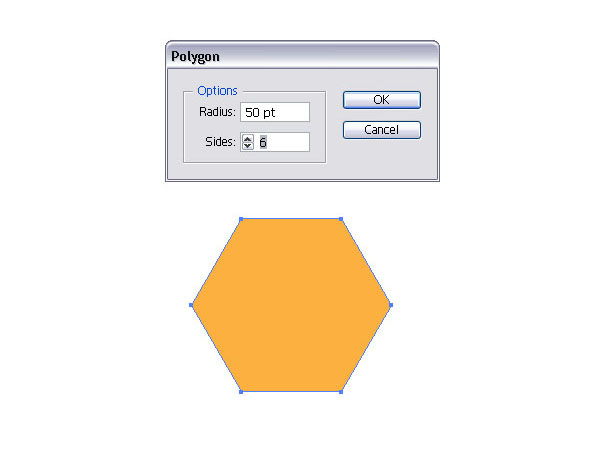
Step 1
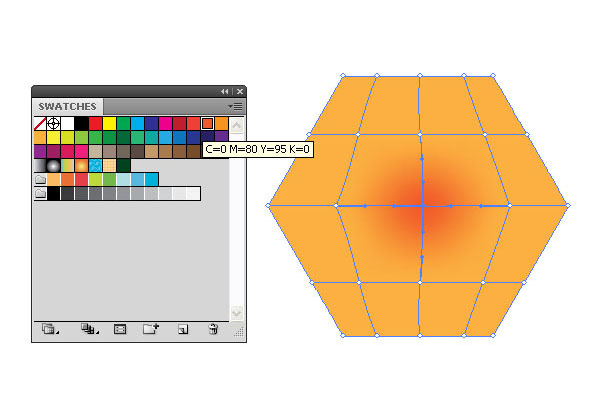
Open up a new document and select the Polygon Tool. Click once on the artboard and choose Radius 50pt and Sides: 6 in the pop up window. Fill the polygon with an orange color.
Step 2
Select the Mesh Tool (U) and start adding mesh points. Click once on the top line of the polygon.
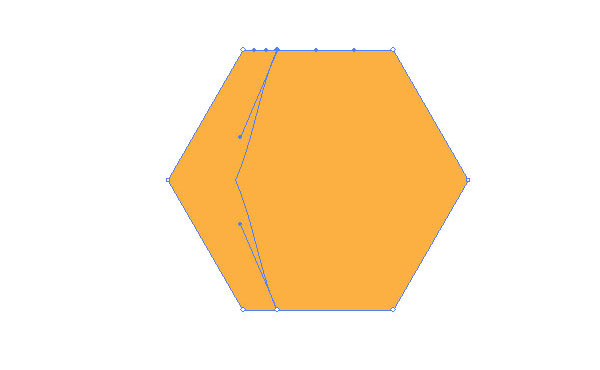
Step 3
Then repeat the step by clicking in the middle and on the right of the top horizontal line of the polygon as shown.
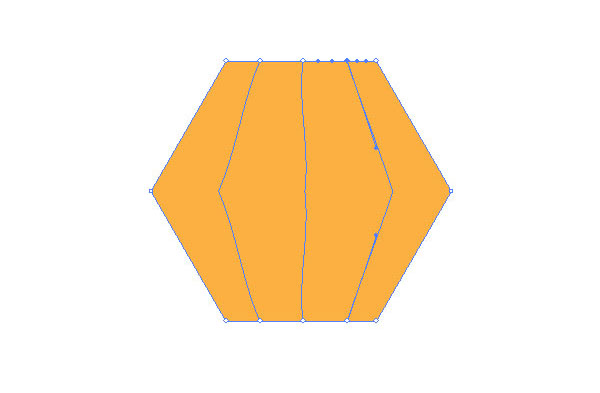
Step 4
Then click once right into the middle of the polygon with the Mesh Tool (U).
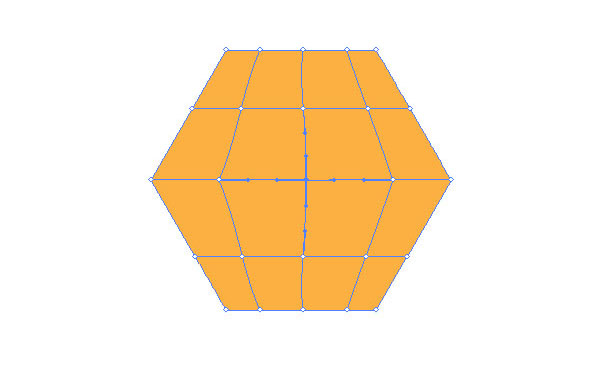
Step 5
Select the Direct selection Tool (A) and highlight the center mesh point, then fill it with a darker orange.
Step 6
Next, select each corner mesh point and fill it with a yellow.
Step 7
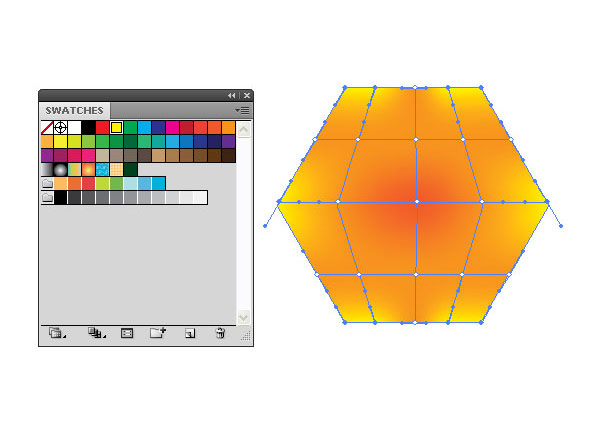
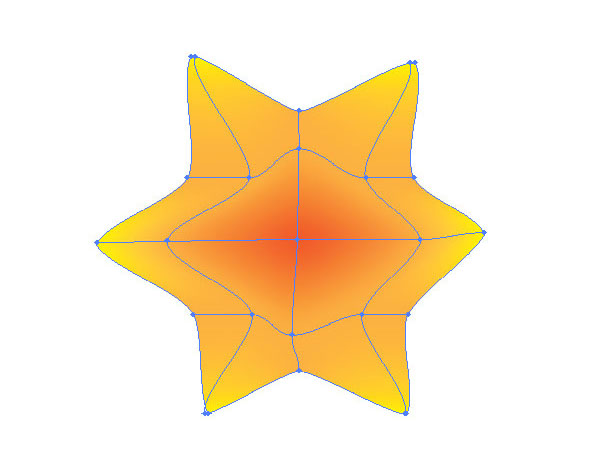
Start dragging each middle mesh point of each side of the polygon towards the middle until you create a similar star shape, just like you see in the image below.
Step 8
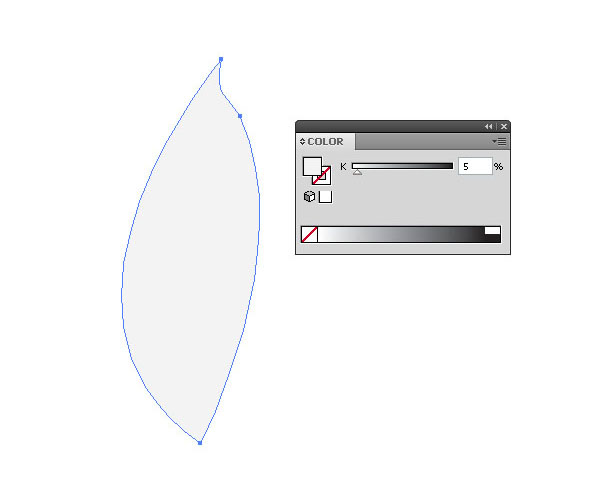
Let's move onto the flower pedal creation. Select the Pen Tool (P) and draw a similar shape as shown in the image below. Fill it with 5% Black.
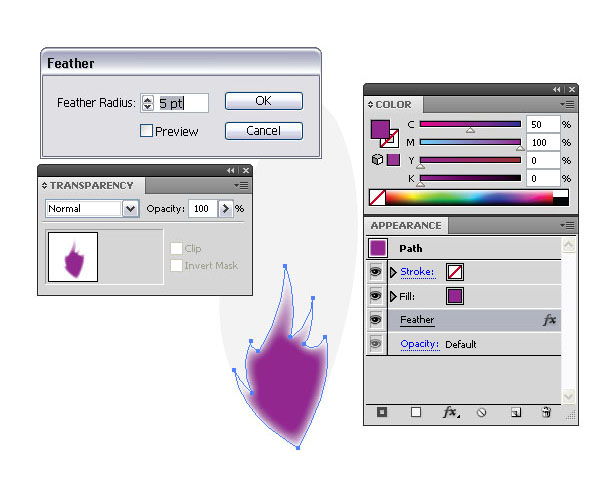
Step 9
Create another shape similar to the one shown below, which will be the bottom part of the flower pedal. Fill it with a pink or any other color of your choice. Then go to Effect > Stylize > Feather, then set the Feather amount to 5pt. Place it on top of the gray pedal.
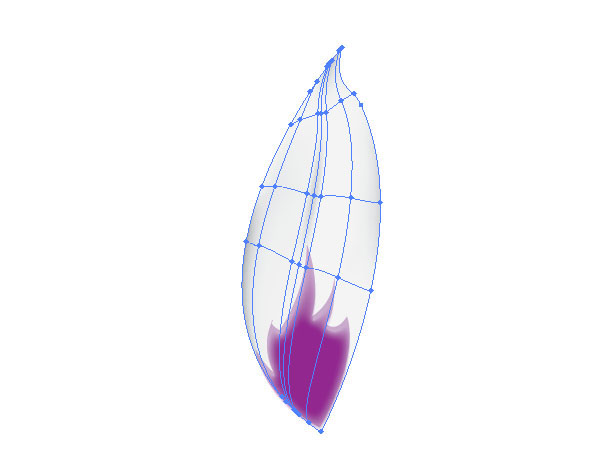
Step 10
Apply mesh points to the pedal with the Mesh Tool (U). Select random mesh points and fill them with a darker gray.
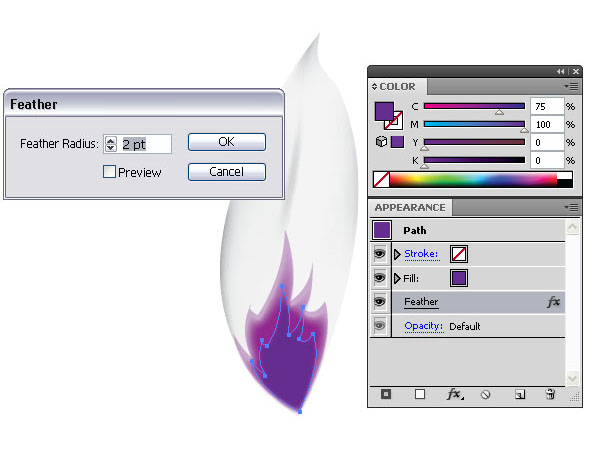
Step 11
Select the smaller pink shape and make a copy. Then scale it down to about 75% of the original one. Fill it with a darker pink or a purple. Apply a Feather effect of 2pt.
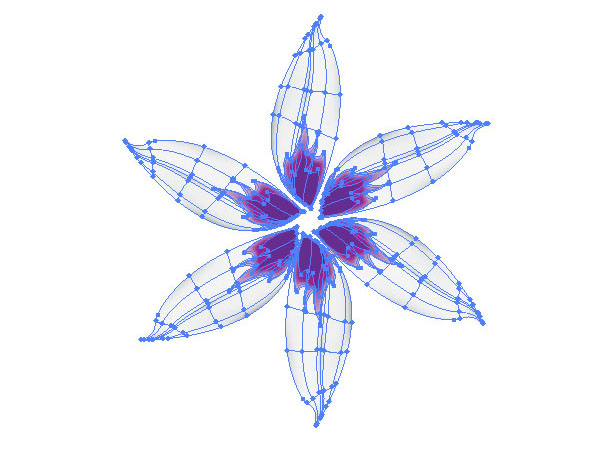
Step 12
Group the flower pedal and the two small shapes together. Then select the grouped shape and Rotate (R) and duplicate it until you have six pedals.
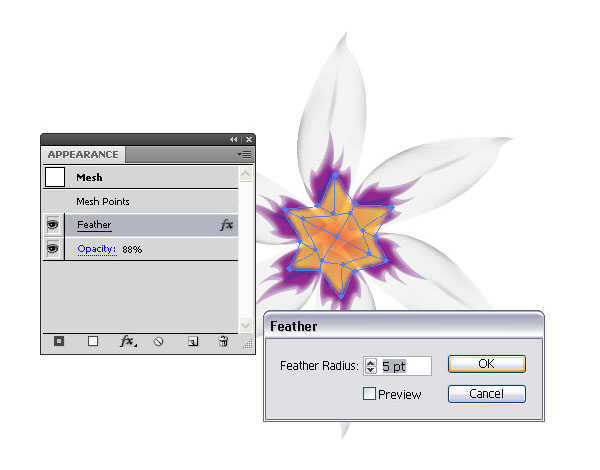
Step 13
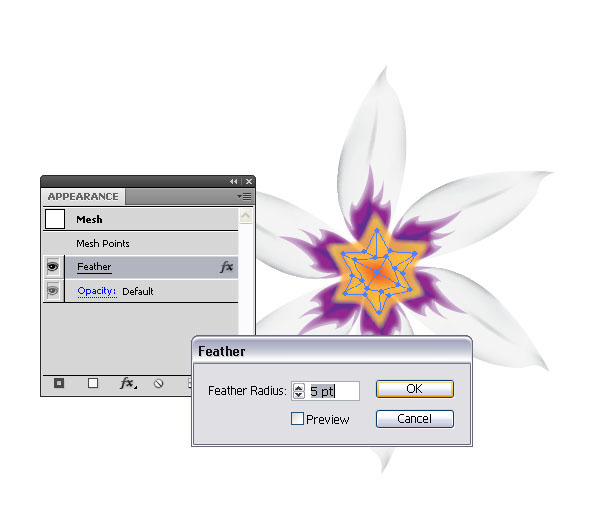
Select the orange shape from Steps 1-4 and place it on top of the pedals. Set the layer mode to 88% Opacity and apply a Feather effect of 5pt.
Step 14
Make a copy of the orange feather shape and scale it down.
Step 15
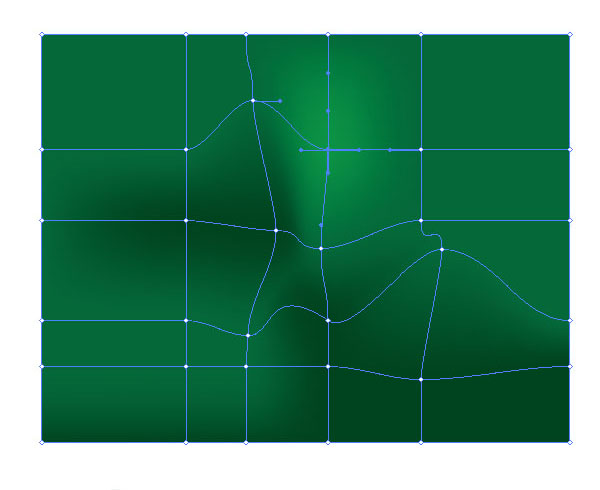
Create a rectangle and fill it with green. Then add mesh points with the Mesh Tool (U). Select random points and fill them with a darker or lighter green. This will be the backdrop.
Step 16
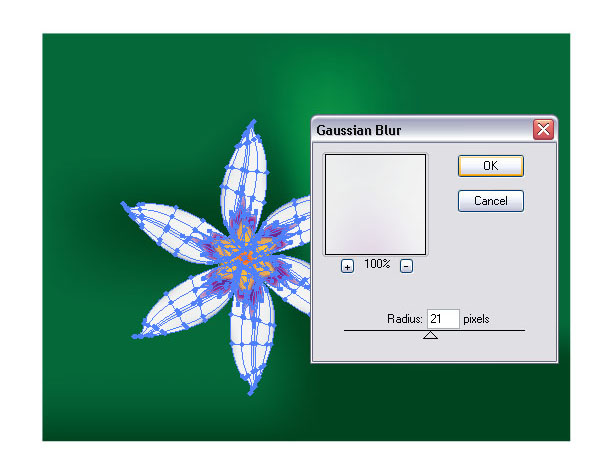
Group all the flower shapes together and make a copy. Then apply a Gaussian Blur effect of 21 pixels.
Step 17
Place it on top of the backdrop.

Step 18
You can add some text on the right.

Step 19
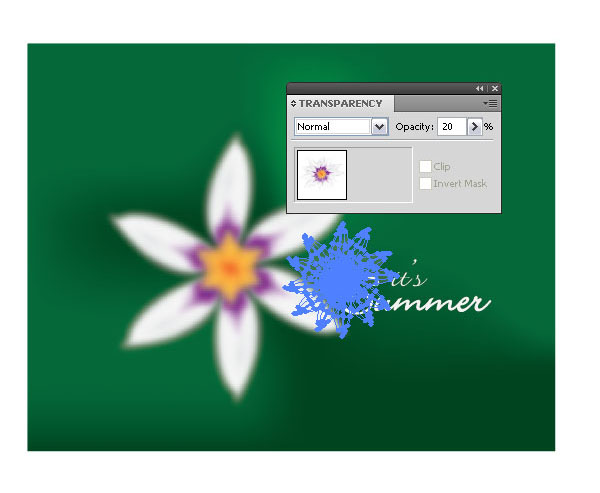
Make a copy of the blurred flower, scale it down and place it to the right of the bigger one. Set the layer mode to 20% Opacity.
Step 20
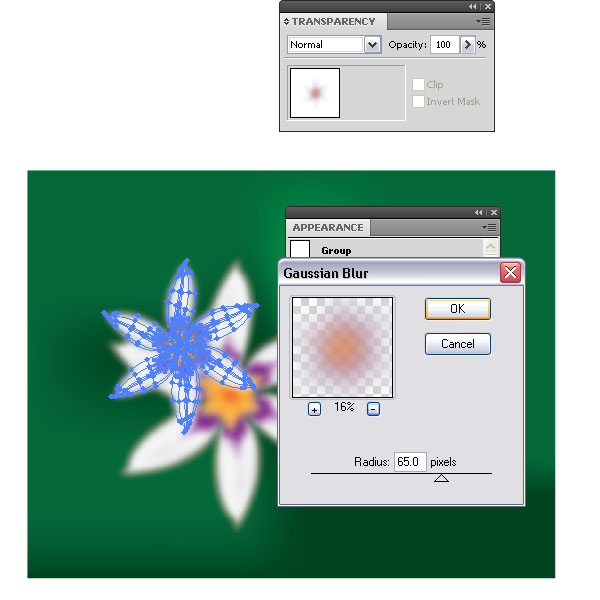
Make another copy and apply a stronger Gaussian Blur of 65 pixels, then place it on top of the big flower. Set the layer mode Opacity back to 100%.
Step 21
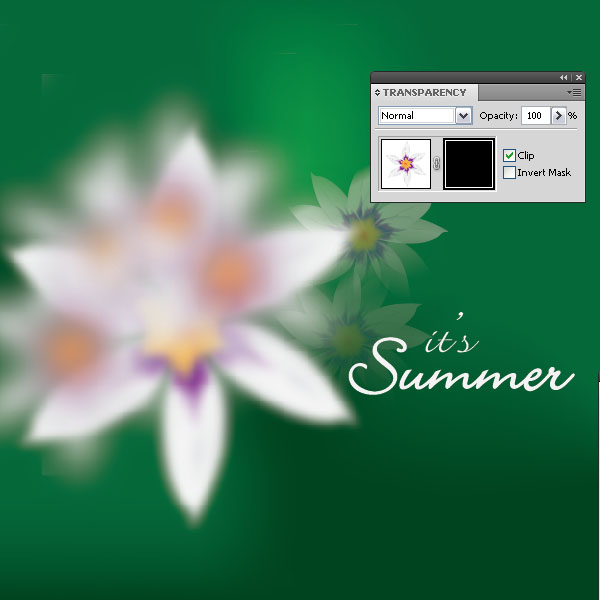
I started adding some Opacity Masks to the original non-blurred flower and placed several into the background in order to create a sense of depth of field. will explain how in the next step.

Step 22
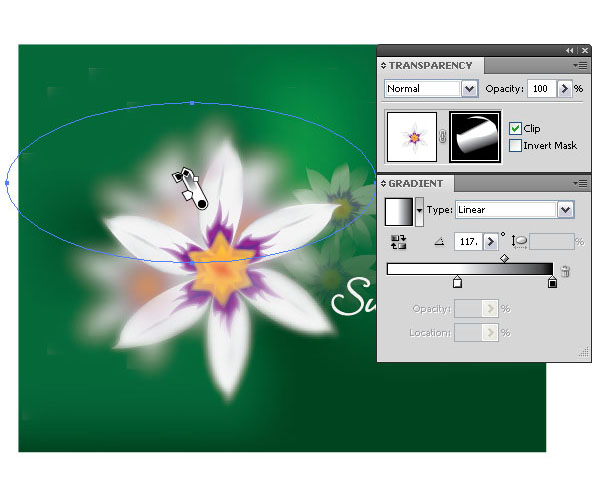
Take a copy of the original flower and apply an Opacity Mask. Select the Opacity Mask window (Black square).
Step 23
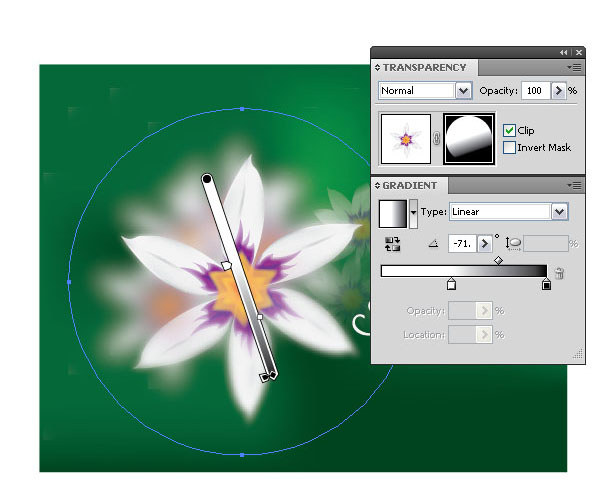
Create a circle that is bigger than the flower and fill it with a black to white linear gradient.
Step 24
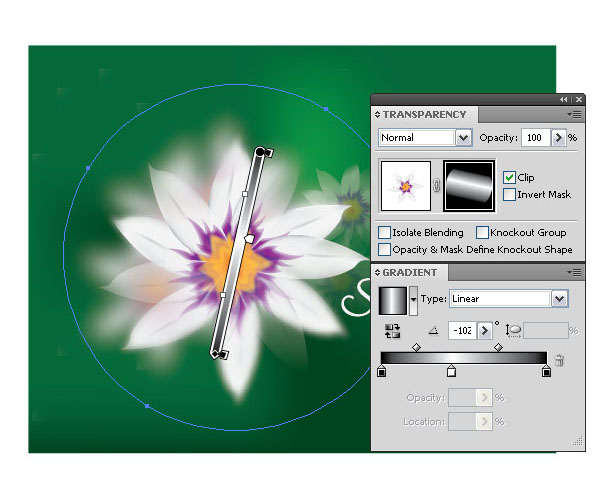
Add another smaller ellipse on top with a black to white gradient. This will hide the edges of the pedals. Remember, we are still in the same Opacity Mask.
Step 25
Leave the Opacity Mask. Place another original flower on top. We want to add another Opacity Mask.

Step 26
Repeat Step 24 and apply another Opacity Mask. As you can see, the image is set up with several flowers placed on top or behind, scaled down or blurred. This will create the illusion of a depth of field and it makes it much more interesting.
Conclusion
Voila, that's it folks. Opacity Masks can be difficult to understand, but they can help to create some awesome effects. Just remember that black hides and white reveals and always make sure that you are in the active Opacity Window and that you leave it by clicking on the layer window next to it.
.

Step 1 - Introduction
Here’s my first tutorial for Designjunk.com. You will be learning how to create a stylish looking clock that can fit in any kind of picture. Above is an example of what your results will hopefully look like!
 Step 2 - Beginning the border
Our first step is to create a document of your liking, I am using 200×200, because I like to have room to work with, but it is completely up to you. Next, we will need to create the shape of our clock. I just used the Circle Marquee tool to draw our outline of the clock. Fill it with whatever color for now, I used black.
 Step 3 - Gradient Overlay
Okay, now. We will take our black circle and make it the metallic colored border around the clock. So simply, right click on the layer, go to blending options, gradients, and use these settings above.
 Step 4 - Smaller Circle
On step 3 we will add the face to the clock. To do this simple just reselect your Selection Marquee tool and make another circle holding shift to make a perfect small circle. Color this white.
 Step 5 - Face Details
Now go to the blending options of that smaller circle layer. Find Gradient Overlay. Now add these colors in the gradient box. Change the black to #B3D2ED and the white to F1F9FF. This should have a smooth blue to white look on it.
 Step 6 - Gradient overlay
Go to our clock outline layer, click on it, and hit ctrl+a to select the whole shape. Then go to your gradient tool and go to preset gradients. Then, select the white with transparent shape. Use the picture above as a reference.
 Step 7 - Stroking the edges
Next, we need some add a stroke on the outside of our clocks face. Again, this adds more depth. You know the drill, find the layer, right click on blending options, then go to stroke. I used the settings above.
 Step 8 - Drawing the Arms
Things are coming together now. Our clock just needs some arms and some markings. For the arms, I will just use the pencil tool (1px or 2px) with a square shape. I used #171717 for their main color. Here again, you can change what you want.Finally, we can add the second hand, this will be the longest hand, thin and red. As a a tip, after you draw the straight line, you can hit ctrl+t on that layer to adjust it like I did.
 Step 9 - Finished. Add the markings!
Finally, we just need markings. I am going to just take the 1px pencil tool, draw 1 straight line then use the transform (ctrl+t) method to put them accordingly along the edges of the clock face. Congrats now, all that “hard” work paid off in the end! Use this as you wish, or download the PSD from Designjunk.com.
Create an Awesome Exploding Glass Effect with Thinking Particles and 3ds Max
Final Effect Preview
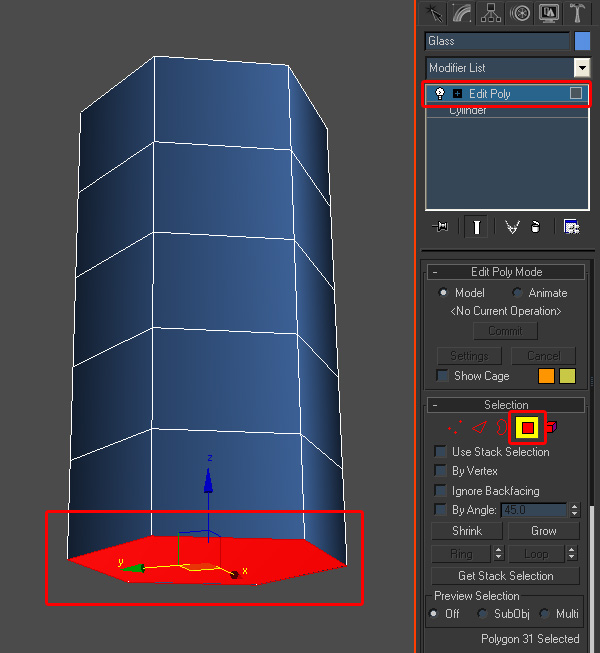
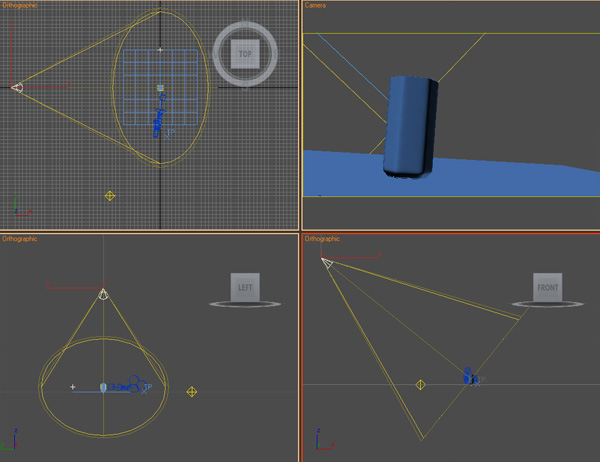
Step 1
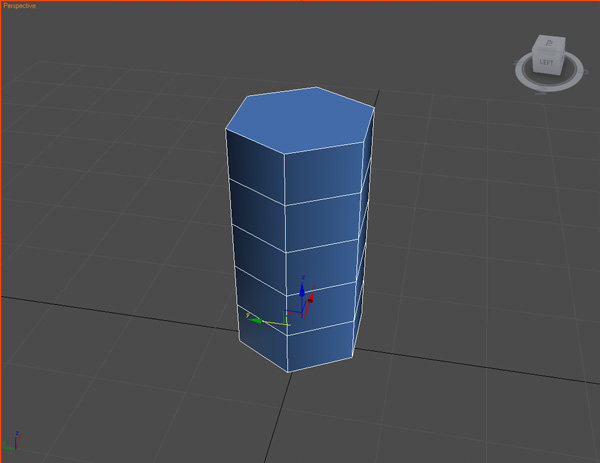
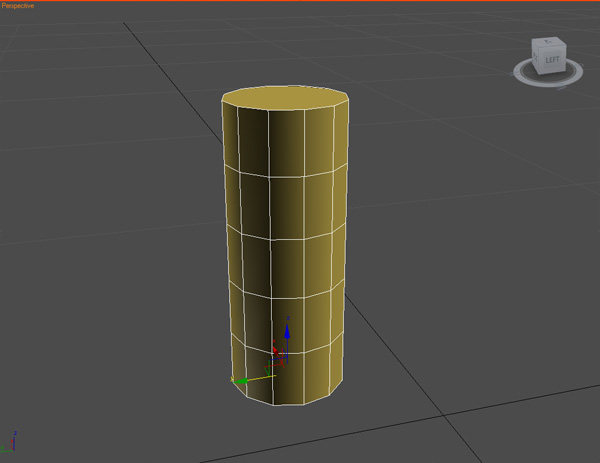
Create a Cylinder and change the name to "Glass". Set the "Radius" to '7', the "Height" to '30', and the "Sides" to '6'.
Step 2
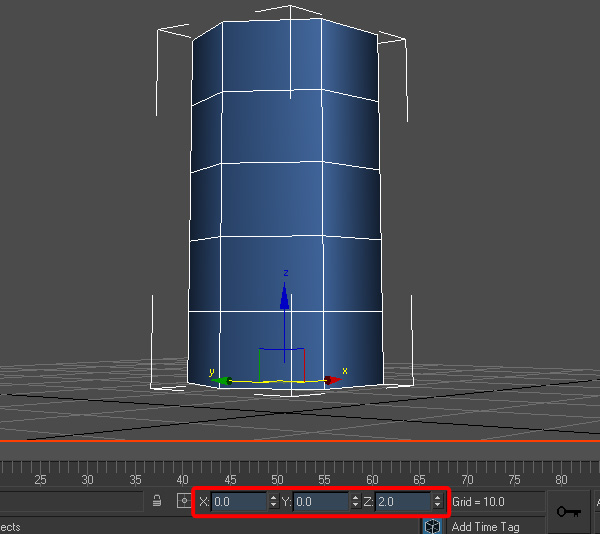
Move the cylinder to the coordinates: x = 0, y = 0, and z = 2.
Step 3
Add an "Edit poly" modifier. Click the "Polygon Selection" icon, and select the bottom polygon.
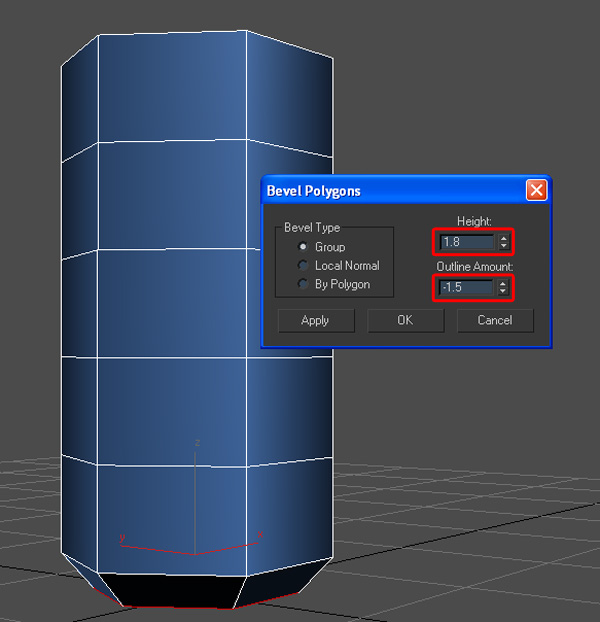
Step 4
In the "Edit Polygons" rollout, click the "Bevel Settings" button. Set the "Height" value to '1.8' and the "Outline Amount" value to '-1.5'. Press OK.
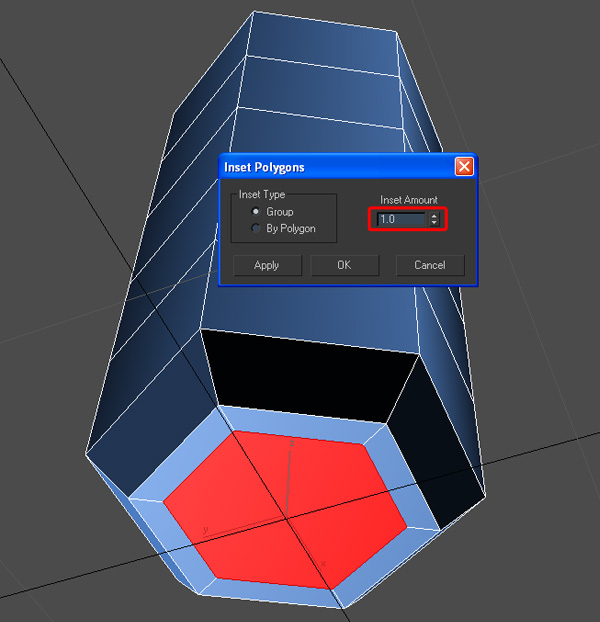
Step 5
With the bottom polygon selected, click the "Inset Settings" button, and set the "Inset Amount" to '1'. Press Ok.
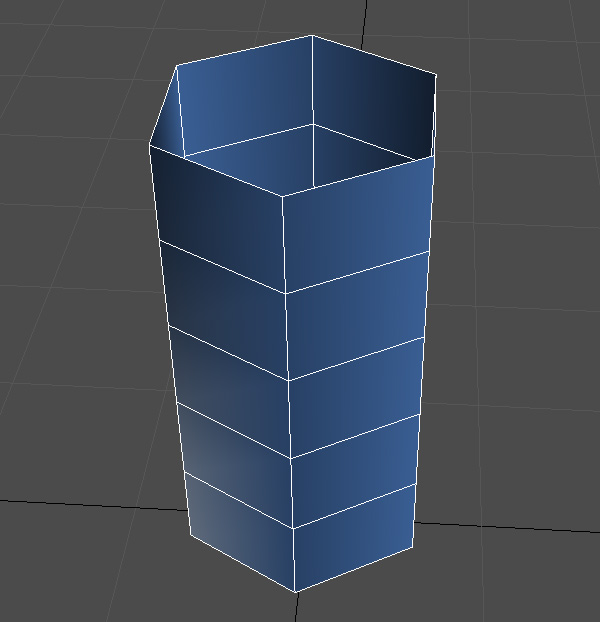
Step 6
Select the top polygon and delete it.
Step 7
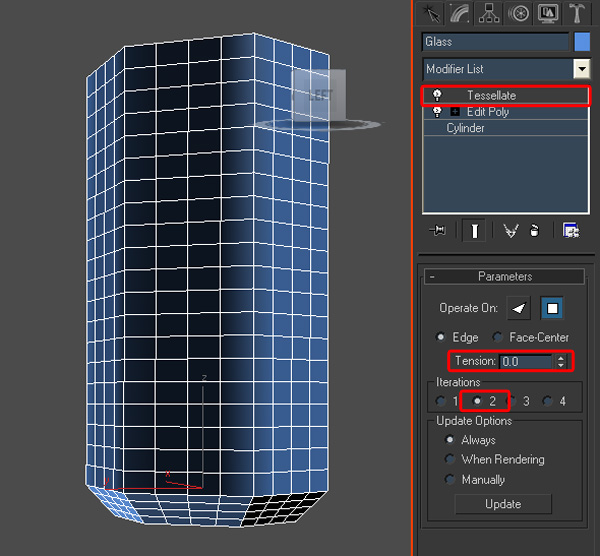
Add a "Tessellate" modifier. Set the "Tension" value to '0.0' and the "Iterations" to '2'.
Step 8
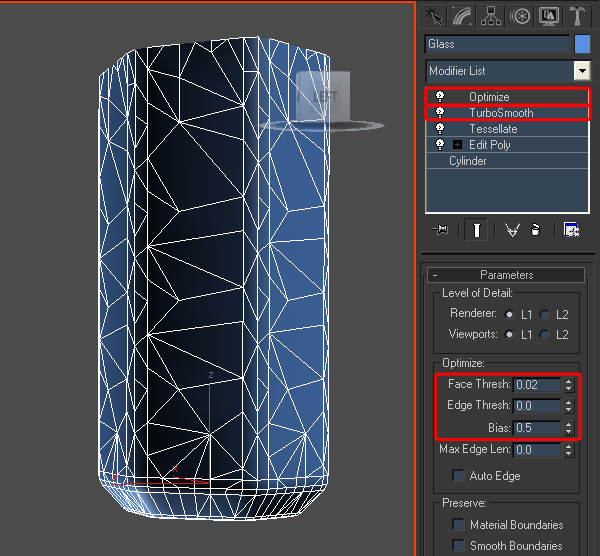
Add a "TurboSmooth" modifier. After that, add an "Optimize" modifier. Set the "Face Threshold" value to '0.02', the "Edge Threshold" value to '0', and the "Bias" value to '0.5'.
Step 9
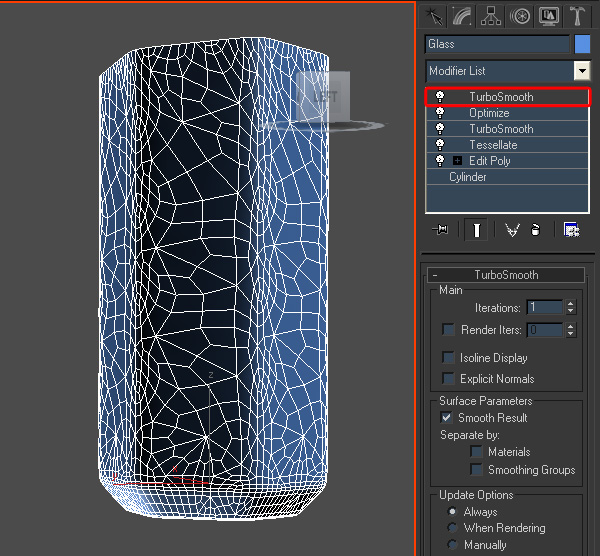
Finally, add a "TurboSmooth" modifier again.
Step 10
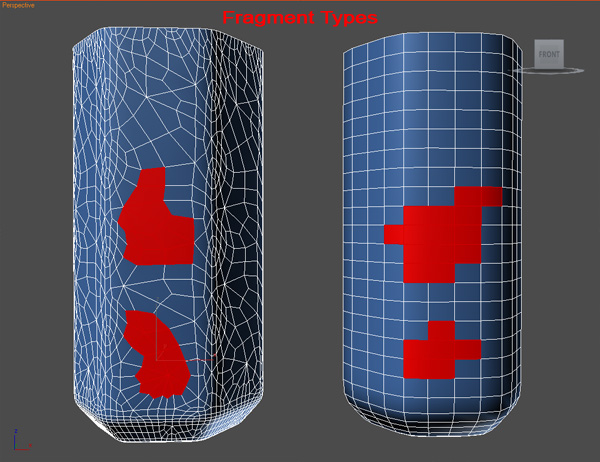
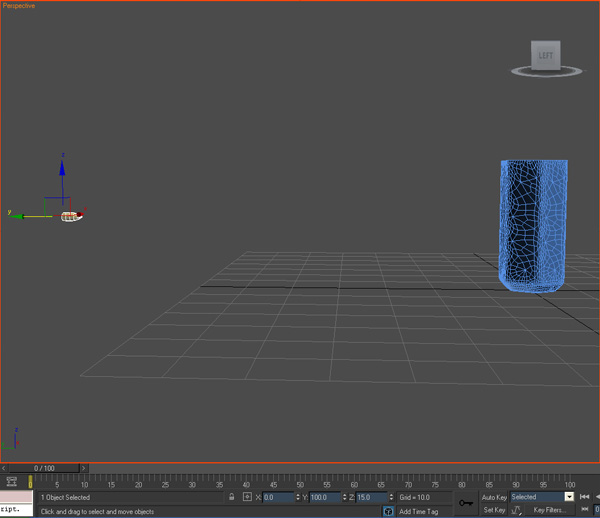
ThinkingParticles 3 creates fragments based on surface edges. The idea is to create glass with random edges, but with a smooth surface. You can see a few examples in the screenshot below.
Step 11
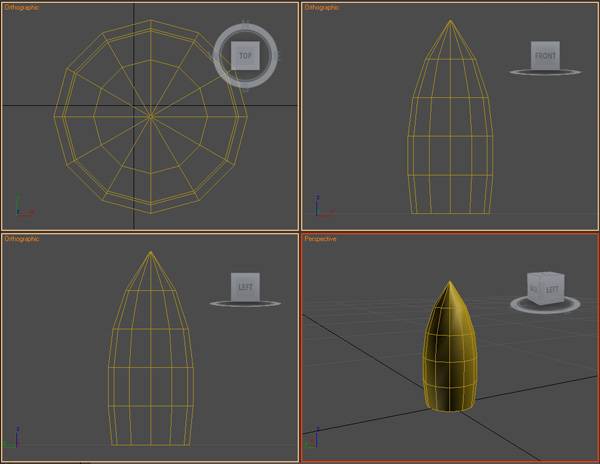
Create another Cylinder, and change the name to "Bullet". Set the "Radius" to '1', the "Height" to '5', and the "Sides" to '12'.
Step 12
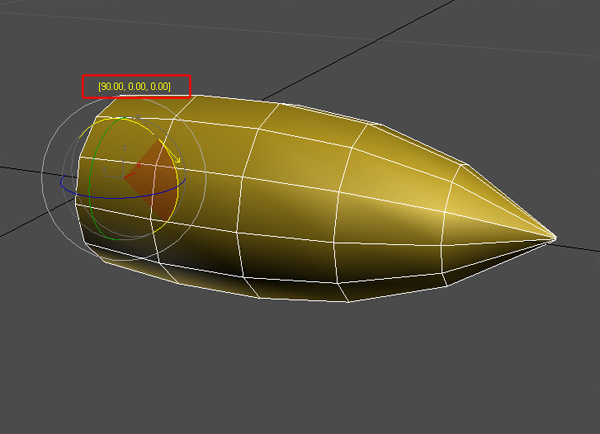
Convert this "Bullet" cylinder to an "Editable Poly", and model it out bullet using the following image as a reference:
Step 13
Press the 'A' key on the keyboard, to turn on "Angle Snaps", and rotate the "Bullet" by '90' degrees on the 'x' axis.
Step 14
Move the "Bullet" to the coordinates: x = 0, y = 100, and z = 15.
Step 15
Create a box for the ground, set the "Height" to '-2', and add more segments.
Step 16
Go to "Command panel > Create > Particle Systems > Thinking", and place a "ThinkingParticles 3" icon in the Viewport.
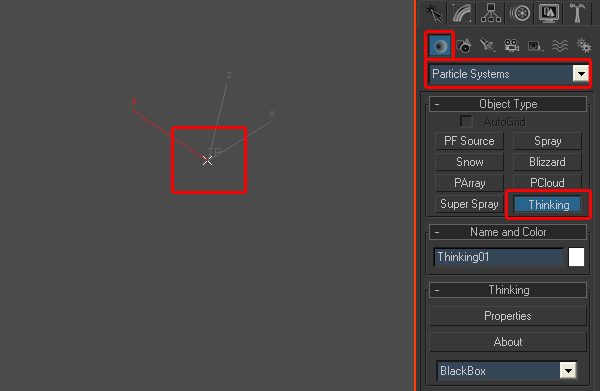
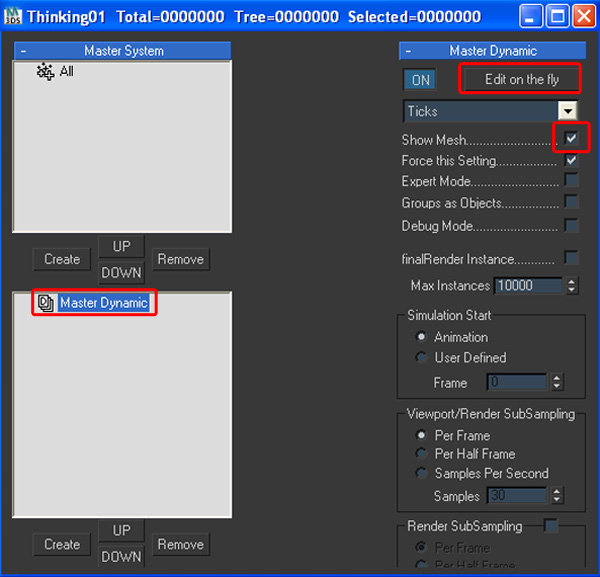
Step 17
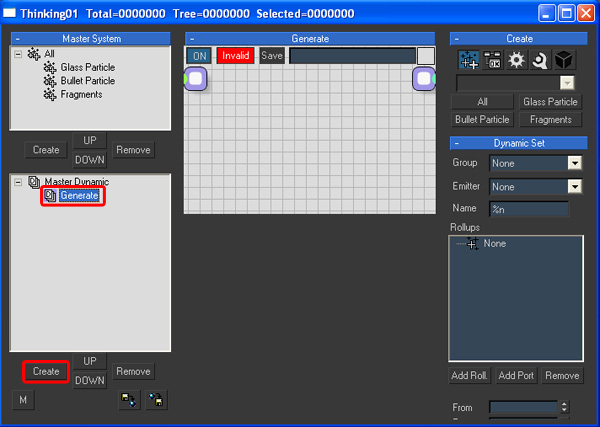
Go to the "Modify" panel, and click "Properties" in the "Thinking" rollout (you can also use 'Alt + Shift + P' to open, and 'Alt + Shift + C' to close the "ThinkingParticles 3" user interface). In the "DynamicSet Tree" view, select "Master Dynamic". Disable "Edit on the fly" to see the changes in real time. Enable "Show Mesh" to see the particle shape.
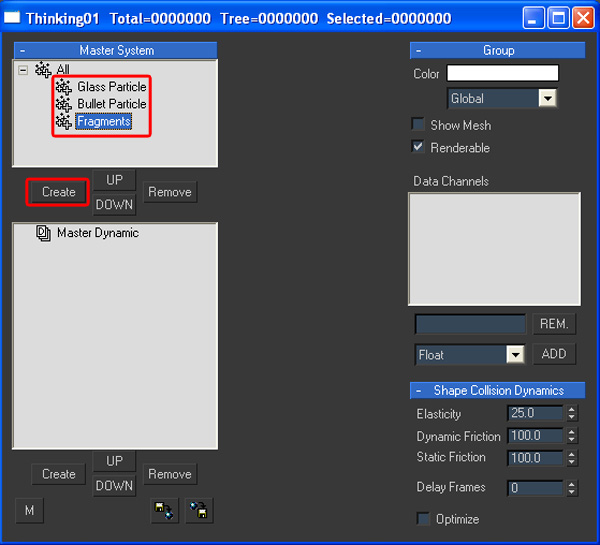
Step 18
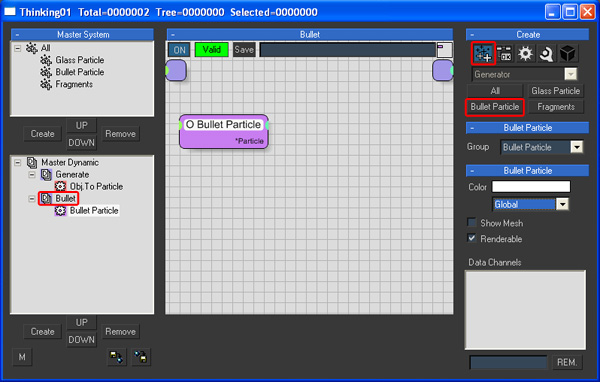
In the "Particle Group Tree" view, click the "Create" button, under "Master System". Name the group "Glass Particle", by clicking on the name "Group" twice (slowly). Create two other groups. Name the first group "Bullet Particle", and the second group "Fragments".
Step 19
Now you need to create a "Dynamic Set" to dictate what the particles do. In the "DynamicSet Tree" view, click the "Create" button, under "Master Dynamic", and name the new Dynamic Set "Generate".
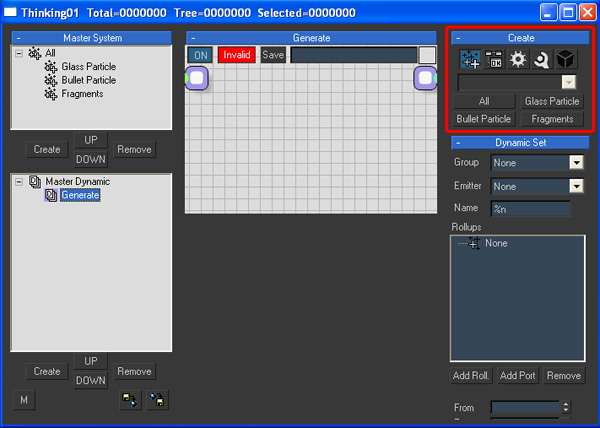
Step 20
Highlight the "Generate" "DynamicSet", and then go to the right-hand side of the dialog, where you will see a new set of "Create" rollouts.
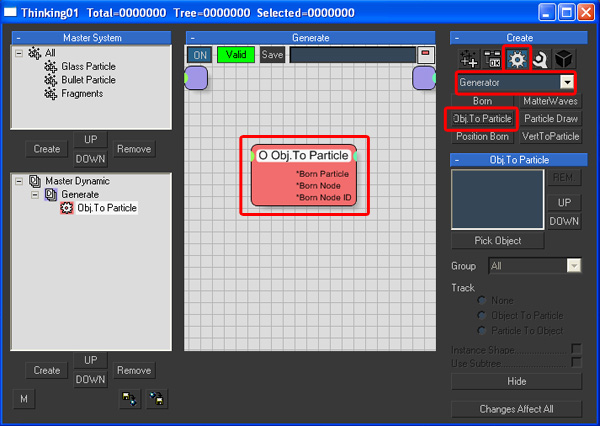
Step 21
Select the "Operators" icon, and then choose "Generator" from the drop down list. Select the "Obj. to Particle" node, to highlight it, then click in the schematic portion of the "Wire Setup" view, and add this node to your "DynamicSet".
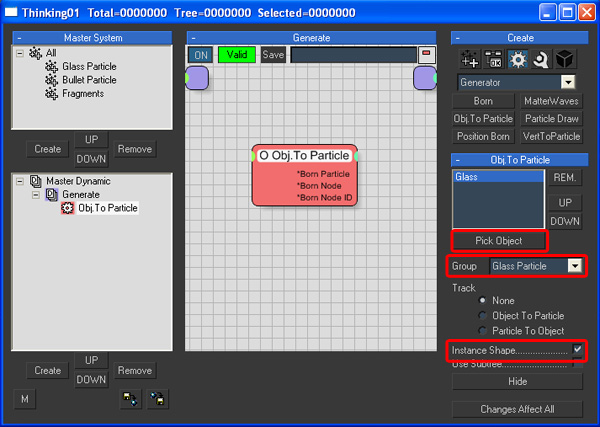
Step 22
In the "Obj. to Particle" rollout (on the right portion that appears), click the "Pick Object" button, and select the "Glass" object in the viewport. From the drop down menu, select "Glass Particle" as your "Group", and enable "Instance Shape".
Step 23
Click the "Pick Object" button again, and select "Bullet". Then select "Bullet Particle" as your "Group", and enable "Instance Shape". The "Obj. to Particle" operator, turned the "Glass" and the "Bullet" into particles, so you can hide them now.

Step 24
Create a new "Dynamic Set" and change the name to "Bullet". In the "Create" panel, click the "Groups" icon, then add the "Bullet Particle" group, in the schematic portion of the "Wire Setup" view.
Step 25
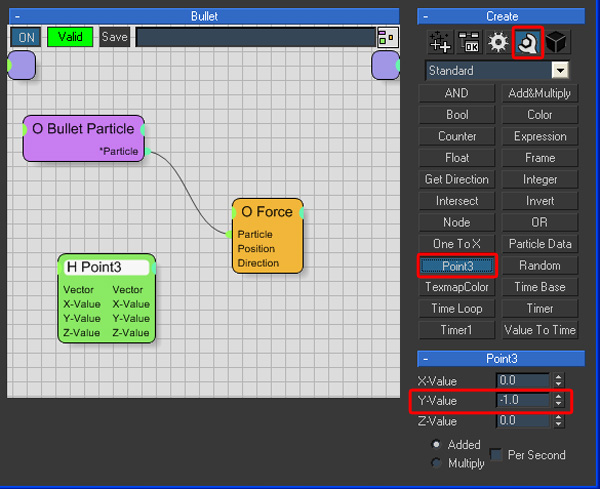
Click the "Operators" icon, and from the drop down list, select "Dynamics". Add a "Force" operator, and set the "Strength" value to '300'. Connect the "Bullet Particle" group to the "Force" operator.

Step 26
You will notice that the bullet particle is moving in the wrong direction, so you need to change the direction vector. Click the "Helpers" icon, and add a "Point3" helper. Set the "Y-Value" to '-1'.
Step 27
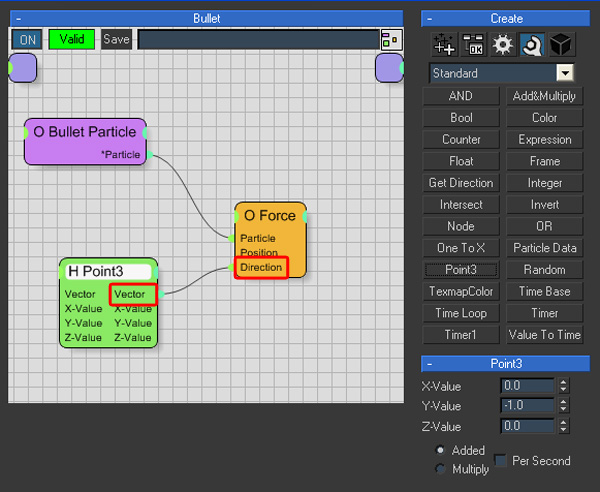
Connect the "Vector" output of the "Point3" helper to the "Direction" input of the "Force" operator. Now the bullet is moving on the 'Y' axis.
Step 28
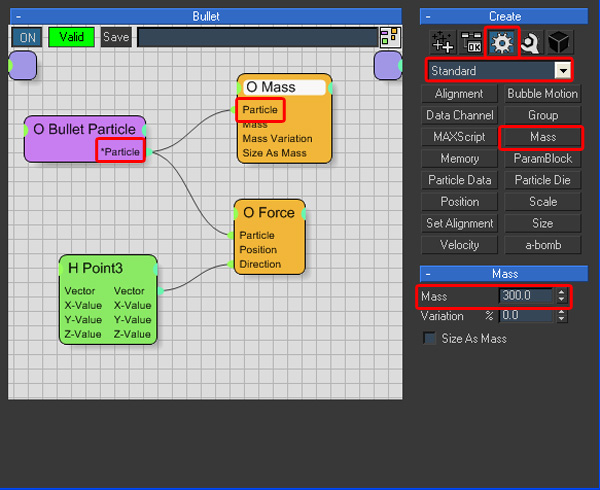
Click the "Operators" icon, and from the drop down list, select "Standard". Add a "Mass" operator, and change the "Mass" value to '300'. Connect the "Bullet Particle" group to the "Mass" operator.
Step 29
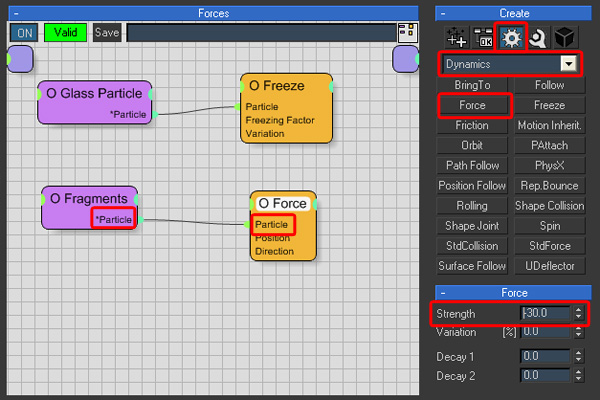
Create a new "Dynamic Set", and change the name to "Forces". In the "Create" panel, click the "Groups" icon. Add the "Glass Particle" group to your Dynamic Set.

Step 30
Click the "Operators" icon, and from the drop down list, select "Dynamics". Add a "Freeze" operator, near the "Glass Particle" group, and set the "Freezing" value to '100'. Connect the "Freeze" operator to the "Glass Particle" group.
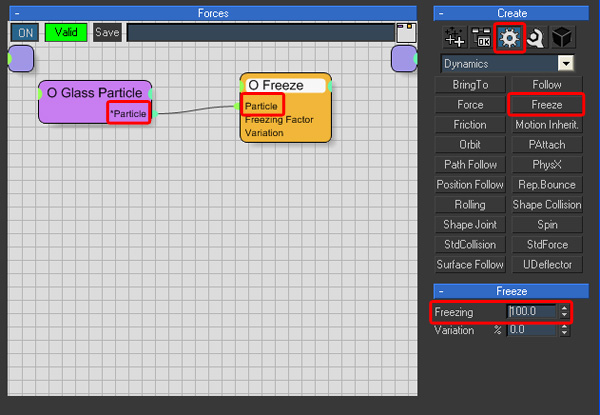
Step 31
Add the "Fragments" group to your Dynamic Set. Click the "Operators" icon, and from the drop down list, select "Dynamics". Add a "Force" operator, and change the "Strength" value to '-30'. Connect the "Force" operator to the "Fragments" group. This will act like a gravity force for the particles.
Step 32
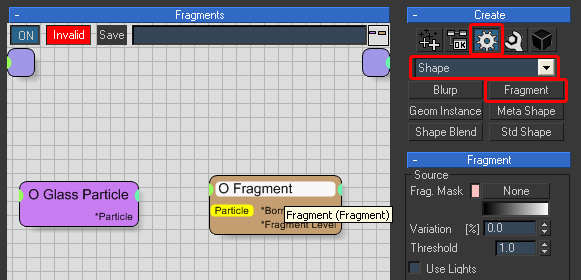
Create a new "Dynamic Set" and change the name to "Fragments". In the "Create" panel, click the "Groups" icon. Add the "Glass Particle" group to your Dynamic Set. Click the "Operators" icon, and from the drop down list, select "Shape". Add a "Fragment" operator, near the "Glass Particle" group.
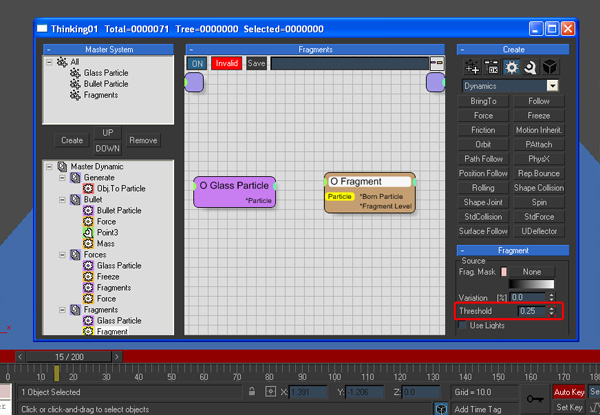
Step 33
To create the fragmentation effect, you need to animate the "Threshold" value in the "Fragment" operator rollout, so turn on "Auto Key". Go to frame '15' and change the "Threshold" value to '0.25'. After that, go to frame '14' and change the "Threshold" value to '1'. Don't forget to turn off "Auto Key" when you are finished.
Step 34
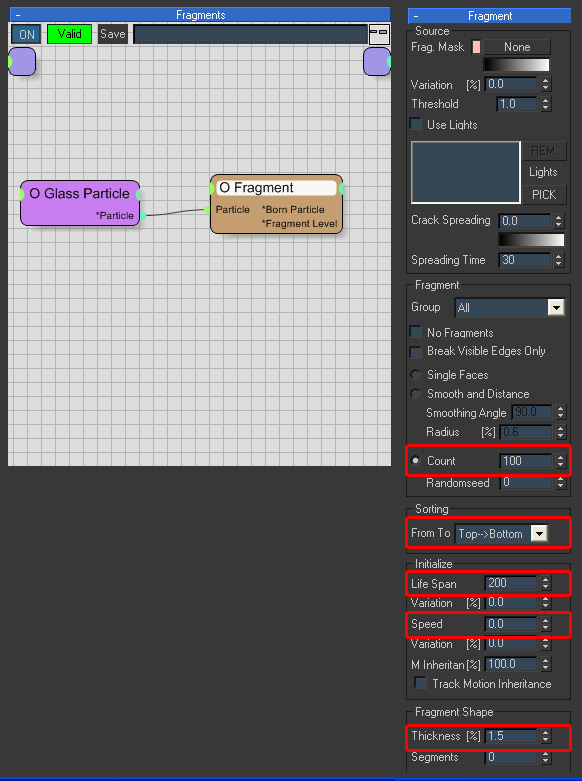
Change the "Fragment Count" to '100', the "Sorting Type" to "Top > Bottom", increase "Life Span", change the "Speed" value to '0', and set the "Thickness" to '1.5'. Connect the "Glass Particle" group to the "Fragment" operator.
Step 35
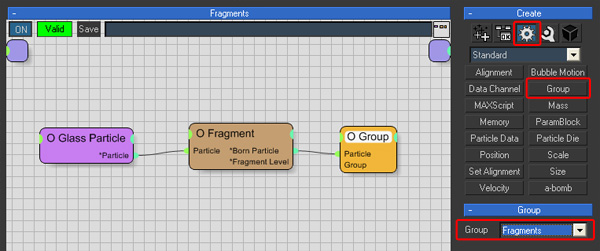
Click the "Operators" icon, and from the drop down list, select "Standard". Add a "Group" operator, and select "Fragments" as your "Group". Connect the "*Born Particle" output of the "Fragment" operator to the "Particle" input of the "Group" operator. This operator is used to transfer the glass pieces into the "Fragments" group.
Step 36
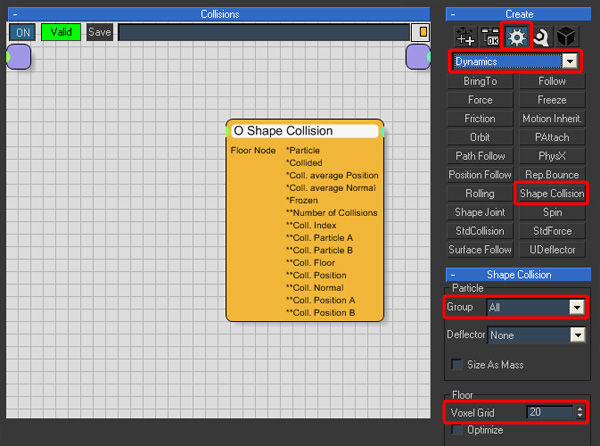
Create a new "Dynamic Set", and change the name to "Collisions". In the "Create" panel, click the "Operators" icon, and from the drop down list, select "Dynamics". Add a "Shape Collision" operator, and select "All" as your "Particle Group". Change the "Floor Voxel Grid" to '20', to get more realistic simulations.
Step 37
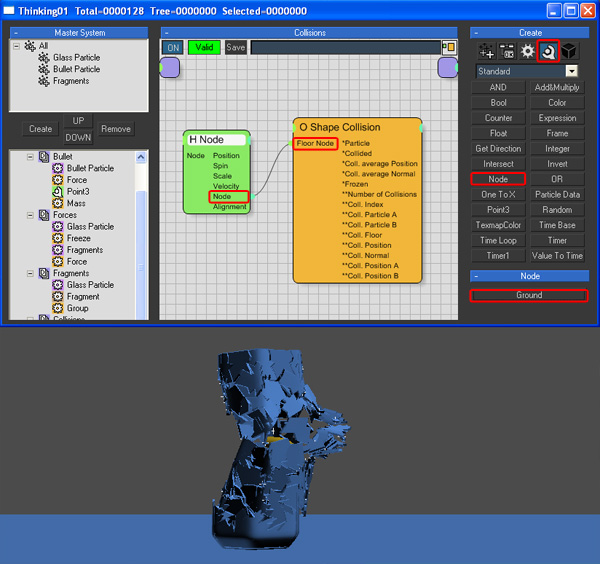
Click the "Helpers" icon and add a "Node" helper, then click the "Pick Node" button and select the "Ground" object. Connect the "Node" output of the "Node" helper to the "Floor Node" input of the "Shape Collision" operator. Play back the animation. The particles should collide with each other, and with the "Ground".
Step 38
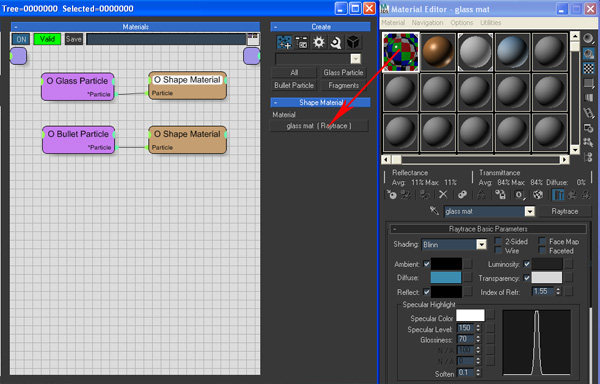
To add materials to the "glass" and the "bullet" particles, create a new "Dynamic Set" and change the name to "Materials". Add to this "Dynamic Set" the "Glass Particle" and the "Bullet Particle" groups. Click the "Operators" icon, and from the drop down list, select "Material". Add two "Shape Material" operators. Connect the first with the "Glass Particle" group and the second with the "Bullet Particle" group.

Step 39
Create a glass material. Because I used "Default Scanline Renderer" for this scene, I created a "Raytrace" glass material, but you can use any materials or render engine you want. Drag and drop this material into the "Shape Material" slot. Do the same thing with the bullet material.
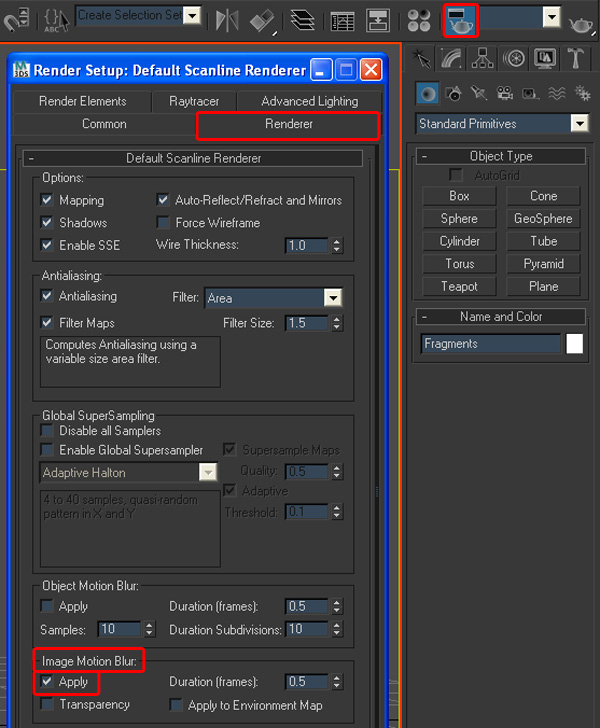
Step 40
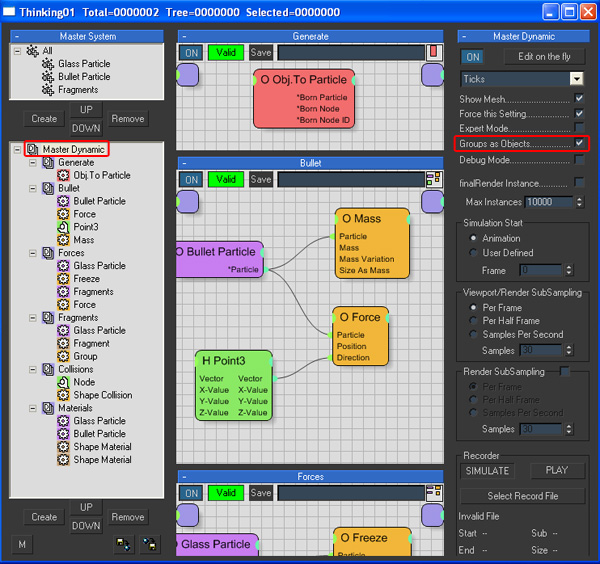
If you are using the "Default Scanline Renderer", you can an apply image motion blur effect directly to the ThinkingParticle icon. If you want to apply different motion blur effects to the particles, select "Master Dynamic", in the TP3 user interface, and enable "Groups as Objects". Now you can select the ThinkingParticles groups, as objects in the viewport.
Step 41
Select the "Fragments" group in the viewport, and apply an image motion blur effect with a "Multiplier" value of '0.25'. Do the same thing with the "Bullet Particle" group, but set the "Multiplier" value to '1'.
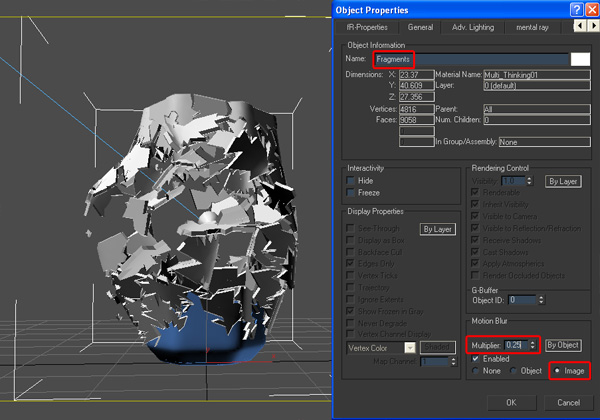
Step 42
Make sure the image motion blur effect is enabled!
Step 43
Create some lights to illuminate your scene.
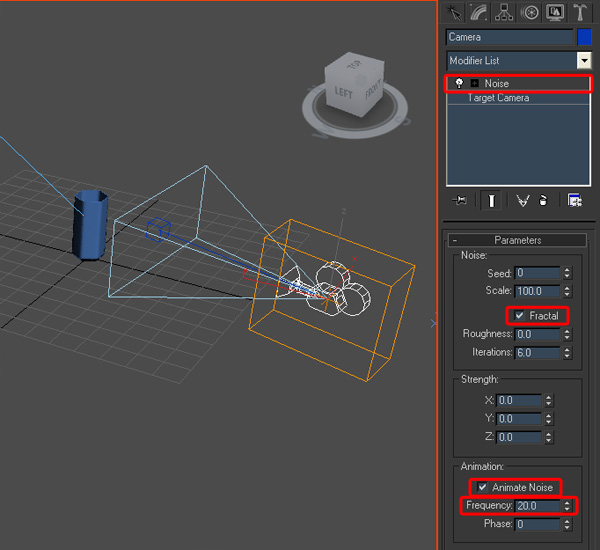
Step 44
To create the camera shaking effect, add a "Noise" modifier to the camera. Change the noise type to "Fractal", enable "Animate Noise", and change the "Frequency" value to '20'.
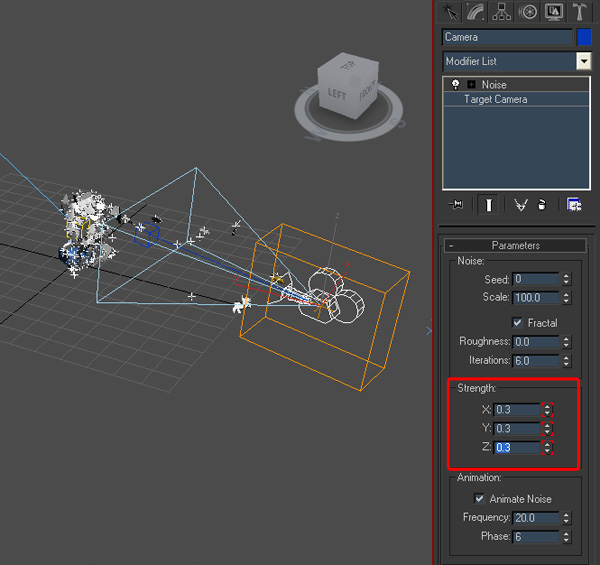
Step 45
Click the "Auto Key" button and, when the bullet is near the camera, set the "Strength" value to '0.3' for all the three axes. Go back 5 frames, and forward 5 frames, and set the "Strength" value to '0'. Turn off "Auto Key".
Step 46
Finally, create a reflexive material for the "Ground" object, and add an image for your background. If you want to obtain a different fragmentation effect, you can move the glass object on the 'x' axis, until you get something you like.
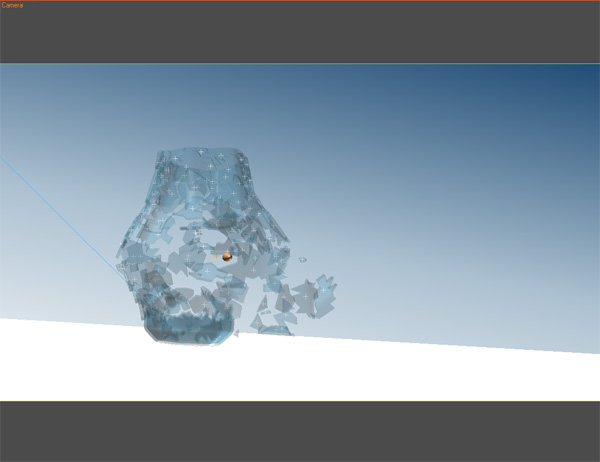
Final Effect
I hope you enjoyed this tutorial. Below you can see my final results.

Opening a file in Microsoft Word 2003
To open a file
OR select the file name by clicking on it, and then click on the Open button. Moving through a Word documentUsing the Keyboard Arrow keysPlace the insertion point anywhere in your document. Use the keyboard arrow keys to move up, down, left and right throughout the document.Using the Keyboard Page Up / Page Down keysIf you press the keyboard Page Up or Page Down keys you will move through your document by approximately one screen per press.Using the Scroll ButtonIf you click once on the down or up arrows at the top or bottom of the scroll bar you will scroll through your document one line at a time.Using the Scroll BarClick on the scroll bar within the vertical scroll bar. As you drag it up and down, you will see page number displayed. When you release the mouse button, you will go to the page number indicated within the yellow colored pop-up.
Microsoft Word 2003 ToolbarsTo display additional toolbarsTo turn a fixed toolbar to a floating toolbar
To re-attach a floating toolbarMicrosoft Word 2003 Selection TechniquesImportant: Before you can apply any formatting to the text, you need to select (highlight) the text first. It can be a word, a line, a paragraph or entire Word document. To select a wordTo select a line To select a paragraphTo select the entire documentDeleting Text in Microsoft Word 2003If you wish a particular text to be disappear from your Microsoft Word 2003 document, then you can use the delete function. To delete a characterTo delete a wordTo delete a line or linesTo delete a block of textTo delete the entire document |


Creating and Opening Workbooks
To start using Microsoft Excel, you can start with a new blank workbook or open the existing Excel file.
To create a new default workbook
OR press Ctrl+N To open a fileOR select the file name by clicking on it, and then click on the Open button. Microsoft Excel - Data Entry TechniquesHere is the guide that shows the easy ways that you can use to enter data into the worksheet. To fill a range of cells with the same dataTo fill a range of cells with the 'automatic' data Note: You also can replace the above A1 and A2 cells with days of week such as Monday, Tuesday,... and months like January, February,... Microsoft Excel - Navigating in the WorksheetHow you can move from one place to another in Microsoft Excel? Here is the ways: To move to a particular cell (quick way) To move from cell to cell using the keyboard
Microsoft Excel - Selection TechniquesThe selection techniques in Microsoft Excel allow you to select or highlight the cell(s) quickly so that you can perform the tasks such as deleting, copying, etc. To select a cellTo select a range of cells by dragging the mouseTo select a range of cells (making up a rectangular block)To select a non-contiguous rangeTo select a rowTo select a columnTo select an entire worksheetMicrosoft Excel - Inserting and DeletingMicrosoft Excel offers a convenient way for you to either insert or delete cell(s), column(s), row(s), or entire worksheet. To insert a row(s) into a worksheet
To insert column(s) into a worksheetTo delete a row or columnTo insert cells or range of cells
To delete cells or ranges of cellsTo insert a worksheetTo delete a worksheet |

No comments:
Post a Comment